
I’m happy to tell you that Melissa Clarkson (@letterbystarlight) is back with another fantastic wreath tutorial! She also has a free tracing printable worksheet for you to download and practice. Thanks Melissa!

Kelly Creates Supplies: Practice Pad (dot or grid), Project Paper Pad, Aqua Brush in Jungle, Dream Pen in Jungle, Black Fineliner 05
Other Supplies: Pencil, eraser, water brush or paint brush
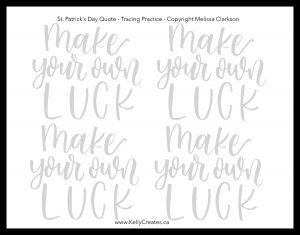
Happy St. Patrick’s Day! I feel so “lucky” that Kelly has asked me to make another tutorial for you! Today we’ll be making a St. Paddy’s themed wreath with a lettered quote in the middle. I’m also including a printable tracing sheet for you to use as a guideline for practice. Click HERE to download this printable worksheet or click the image below.
To help me figure out my quote design, I like to use my Kelly Creates practice dot pad to sketch my lettering in pencil first. Once I have the words spaced out the way that I like, I will transfer the design onto my final project paper (mix media or Kelly Creates super smooth card stock from the Project Pad). You can use a light pad or place your paper on a sunny window to trace your design.

To start our wreath, we will first letter our quote in the center of the paper in pencil. Next we will create a circle around the lettering using a circle maker, a bowl or compass. Make sure you allow enough space between your letters and the wreath to draw your shamrocks and leaves.

Next you will start drawing your four leaf clover / shamrocks. These can be a little tricky to draw, so I’ve included a little step by step!

With your pencil, lightly sketch a cluster of three shamrocks at the bottom and one at the top of the circle. Next add four more shamrocks around the sides of the wreath. I like to place them in areas where there are larger gaps between the wreath and the words.

Fill in the remaining gaps in the wreath with simple leaves. If you like, you can make your leaves more elaborate. I chose these simple shapes to keep the focus on the shamrocks.

Next we will go over the wreath design using a Kelly Creates 05 Black Fineliner. [I prefer this size of Fineliner but there are 5 other sizes in Kelly’s set of 6 that you can use.]

Once you’ve inked in the wreath, erase any remaining pencil marks.

Now we are ready to paint our wreath! I love to use Kelly Creates Aqua Brushes as watercolor. I’m only using one color of green to paint in the whole wreath. By using the Aqua Brush with and without water, you will get lighter and darker shades of green. (NOTE: You could use the ‘Jade’ Aqua Brush as well for a variety of greens).

The first method is to color in the shamrocks with the Kelly Creates Aqua Brush directly. This will result in a more saturated, intense color.

To achieve lighter shades of green, scribble some of the pen’s ink onto the Kelly Creates Blending Palette. Pick up the color with a water brush and paint the clover.
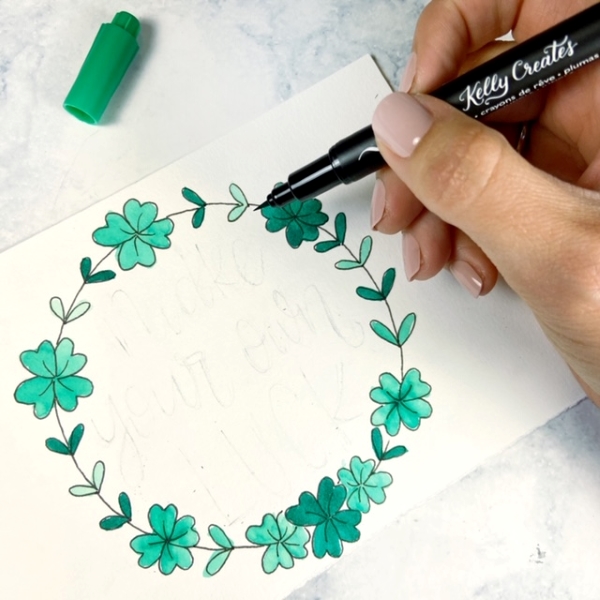
Once all your shamrocks are painted, use the same methods to add color to your leaves. I like to alternate darker and lighter for every other leaf.

After your wreath is colored, we will move on to the lettering. Before you letter your quote, lightly erase your pencil marks. Next, trace over it with the small end of your Kelly Creates Jungle Dream Pen. Once the ink is dry, carefully erase any remaining pencil marks.
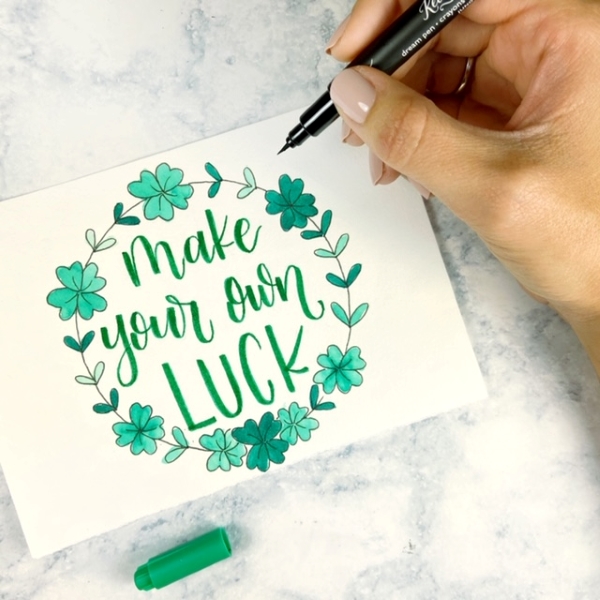
Now your wreath is complete! Use #KellyCreates and tag me @letterbystarlight on Instagram if you try this design – I would love to see it! Or come by our Kelly Creates Art & Calligraphy Facebook group and share your lettering there.
********************************
Visit Melissa’s website for more lettering tips and inspiration http://www.letterbystarlight.com and follow her on Instagram @letterbystarlight.
To shop the supplies Melissa used in this project, click the affiliate links below OR visit my online store http://www.KellyCreatesStore.com


PIN ME!

Linda
March 12, 2020 at 12:30 pm (6 years ago)This is lovely, Melissa. Thank you for the tutorial and printable worksheet.
Charlotte
March 15, 2020 at 11:37 am (6 years ago)This is amazing and very helpful