
Stephanie Rooney (@simplystephlettering) is on the blog with an awesome tutorial on how to use hand lettering to make your own calendar!

I can’t believe it is January, the start of a new year! One thing I like to do to set myself up for a successful year is to create and fill in my calendars and planners. It helps me feel organized and ready to tackle everything the year may throw at me, especially being a graduate student, organization is key! My digital daily planner is all set to go, but I also like to display a monthly calendar in my home for my husband and I to remember birthdays and important dates. This year, rather than purchasing a calendar, I have decided to make my own calendar pages!
 Kelly Creates supplies: Project Paper Pad, Dream Pens, Black Fineliners, Multicolor Fineliners
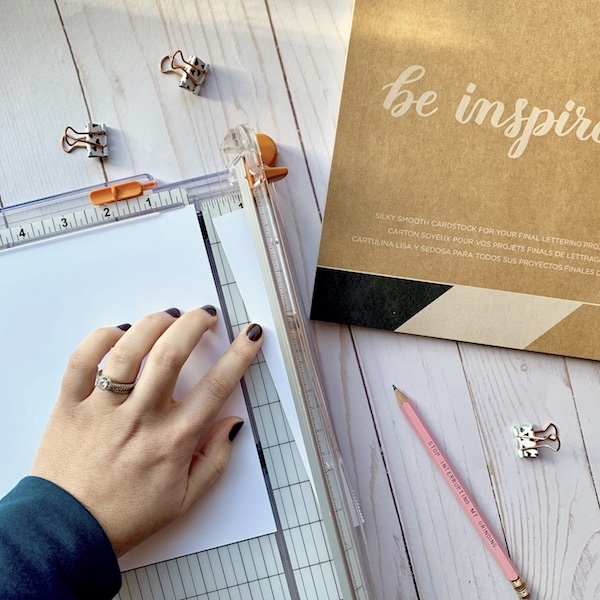
Additional supplies: Pencil, Eraser, Ruler, Trimmer, Binder clips
First, using pieces of cardstock from the Kelly Creates Project Paper Pad, measure and cut the pages down to the size of your choosing. I chose white pieces, but you can also use the black or Kraft card stock too. I like a larger calendar, so I cut my pages down to 8×10 inches. Make sure you have 12 pieces, one for every month.
Next comes a bit of measuring and line drawing. Remember to draw lightly, as these lines will be erased later! First, measure a 1 centimeter border around the edge of the paper using your ruler and pencil. This gives you a nice border that you can either leave plain and erase the lines later or create something festive for each month. Next, at the top of the paper, measure 2 inches down from your 1 centimeter line, and draw another line. This gives you space to write in the name of each month. Finally, measure 1 centimeter below the bottom of your 2 inch line and draw another line. This puts a space between your month name and your calendar. Your page should now look like this:
 Now, see that big box in the middle? That will become our calendar! First, we will measure out 7 columns for the 7 days in a week. The columns should be equal in size. If you are creating an 8×10 calendar like myself, measuring between your centimeter lines, each column will be about 2.5 cm wide. Your page should now look like this:

Next, for your rows, you first want to measure a 1 cm space at the top of your columns to create a space to write in the days of the week. Then, going down the calendar, measure out 5 rows. On an 8×10 page, your rows will measure about 3.25 centimeters in height. We are DONE measuring now, and your page should now look like this:

Now we can get to creating! Using one of your Kelly Creates Black Fineliners, trace over your calendar lines! I chose the 03 thickness for my lines.

Creativity comes in next! Write in the month at the top of your calendar page using one of your Kelly Creates Dream Pens, and fill in your days of the week, calendar numbers, and any holidays or important dates you already know of using either your Kelly Creates Black Fineliners and/or Kelly Creates Multicolor Fineliners. For my January page, I used Kelly Creates Dream Pen in “Ocean” to write the month, and my Kelly Creates Multicolor Fineliners in “Ocean” and “Storm” to write in my days of the week and calendar numbers.
Let your personal creativity shine at this point! My forte is hand lettering and calligraphy, so I incorporated my bounce lettering skills into my calendar pages. I added grey snowflakes and shadow lines with the Kelly Creates fineliner. When you are done creating, make sure to erase any pencil lines!

When you are done, clip your pages together using your binder clips. I clip mine at the top so that I can hang my calendar up on the wall, but you can clip yours together any way you like! You can create all 12 of your month pages at once, or you can create one or two at a time, that way you can change up your calendar style to see what fits for you and your lifestyle!

Thanks Stephanie! Why haven’t I ever thought of making my own calendar? It’s such a practical and creative way to use our lettering skills.
For more inspiration from Stephanie, follow her on Instagram (@simplystephlettering) and Facebook.
Shop the supplies Stephanie used by clicking on the images below.


Meagan
January 21, 2019 at 8:52 am (5 years ago)Cute idea! I always feel guilty about buying wall calendars and then never using them, this way I can just make my own!
Linda Epstein
January 21, 2019 at 6:42 pm (5 years ago)Nice tutorial. Love the calendar.