
Say hello again to Chasity who is here with a fabulous Fall Home Decor tutorial using Kelly Creates watercolor inks!
Kelly Creates Supplies: Watercolor Inks Set 1, Set 2, Set 3; Lettering Brushes, Deluxe Lettering Kit, Black Fineliner, daisy palette
OTHER SUPPLIES: Blank Wood Sign, plastic greenery, Glue Gun, Scissors, large paint brush
Hey Lettering Friends! Fall is in full swing here, and you know it’s my favorite season! I love everything about fall, but I love decorating for this season most of all.

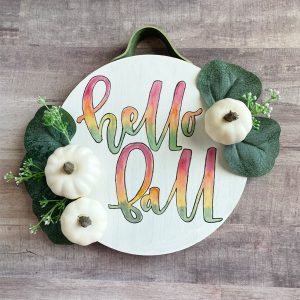
I like scouring the Dollar Stores for inexpensive home décor items I can personalize and make my own. I found this wood sign that is really great quality, thick and only $3 USD in the Dollar Store where I shopped.
I started by painting the wood surface with the Kelly Creates White Watercolor Ink from Set 3. This is a little thicker than the rest of the watercolor inks and is more like a ‘gouache’ because it is more opaque and gives perfect coverage. You can dilute it a little with water if you find it too thick. (NOTE: Clean your brush well right after you finish painting the sign).

I only had to apply one coat. I then set the sign aside to dry before I continued. As you can see, it has great coverage. I really love this about the white that is included in Kelly’s watercolors.

While I was waiting for that to dry, I snipped off the small pumpkins and a few leaves from the garland I bought. I like the 3D look the pumpkins and leaves will add to the project.

Once the paint was dry, I penciled in the words “hello fall”. I made sure the letters were thick so I could fill them in with watercolors.

I always like to start with a pencil sketch and make sure everything looks the way I want it to look, and everything is spaced nicely. If I don’t start with a sketch, it usually doesn’t end well for me!

OK, now it’s time to add some watercolor inks! I wanted the letters to mimic the colors of fall and the changing of leaves. It’s my favorite part of fall! I worked from the top of the letters down, changing colors as needed for the look I desired. I purposely let the colors run into each other, for a more pretty blended effect. NOTE: If you find the letter edges are bleeding and spreading into the wood, add a coat of “Watercolor Ground” before painting (as I did in this tutorial HERE).
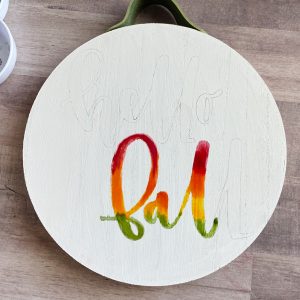
Keep in mind when you are painting the letters with watercolor inks, they take time to dry, and you don’t want your hand to smudge what you have painted already. I suggest starting with the ‘hello,’ not the ‘fall’ like I did!
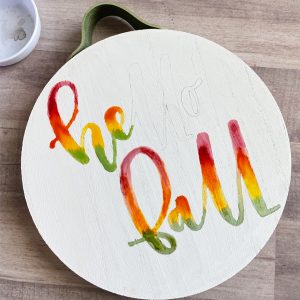
As you can see, the watercolor inks blended nicely. Be careful not to dilute the watercolor inks with too much water in the daisy palette. This may cause bleeding outside the letter. If you get a little bleeding, don’t worry. We are going to outline the letters with the black fineliner, and this will help. (NOTE: You can test your wood for bleeding by painting with inks on the reverse side.

Keep painting the letters with the #4 lettering brush. I love this size brush because its tip is small enough to paint those little areas in the letters perfectly! Set the sign aside to dry. I did notice that the watercolor inks dried lighter on top of the white painted base. I loved the subtle look this gave to the piece!
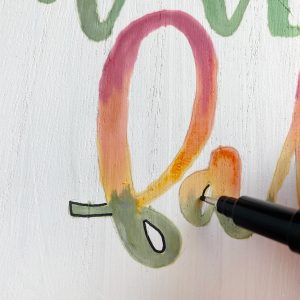
Once the sign is dry, use the 08 Black Fineliner to trace the outside of the letters to give them a crisp finished look.

Here is an image of the completed lettering. The black fineliner pens are so great for these types of projects because they work on the painted surface and the color is still black! These are my favorite go-to pens for sure because they are permanent, waterproof and fast drying!

The last step is to hot glue the greenery to the sign, arranging them any way you like.

I hope you are inspired to create your own Fall home décor and give this tutorial a try. If you make this or something similar, be sure to share it with #kellycreates on social with so we can see what you create!
********************************
For more lettering and crafty inspiration, follow Chasity on Instagram @chiciscre8ive
Shop the supplies Chasity used in her project by visiting Kelly’s online store http://www.kellycreatesstore.com or click the images below. You can also shop for Kelly’s products at retailers around the world HERE.


