
We all need birthday card ideas, don’t we? Chasity has a fantastic tutorial for you today on how to design your own birthday banner for a card!

Kelly Creates Supplies: Watercolor Palette, Watercolor Paper pad, Lettering brushes, Deluxe Lettering Kit, Watercolor Inks Set 1 and Set 2, Watercolor grid practice paper
Other Supplies: Paper Trimmer, Foam Dots, Cardstock, Adhesive
Hello Lettering Friends! I hope that you are doing amazing and creating with all your Kelly Creates products! July is my birthday month, and even though I no longer celebrate my birthdays, haha, I wanted to show you a fun watercolor birthday banner tutorial that you can create to make epic birthday cards, décor and more!.You can also change up the colors and make these banners seasonal for any special occasion. So come along and create with me and make a fun birthday card!
I started by sketching out the banners on Kelly Creates Grid practice paper to get the look I wanted. These banners have pleats and gussets, so I wanted to make sure that those were even.

I started with the middle pleat to make sure it was centered and drew the others from there. Remember that the gussets are slightly shorter than the front of the pleat. I know these look funny right now, but adding some shading later and these will come together. Promise!

Next, I drew the second banner the same way as the first. You can make as many banners as you want! How cute would these banners be on a cake? Since I am making a card, I only drew the 2 banners, but the sky’s the limit! I also drew a 3rd banner between the two that would be a solid color to offset the 2.

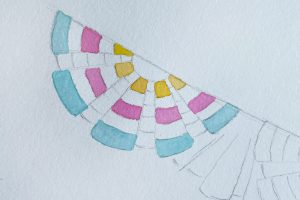
Then I drew the stripes on the banners and shaded them so you could see how these will come together. Shading will make all the difference when painting these banners with the Kelly Creates Watercolor Inks. When drawing the stripes, the gusset stripes will be up a little since the gussets are shorter than the pleats (think about folds and dimension).

Once you get the look right, it’s time to move on to watercolor paper. I drew them in pencil very lightly so I could erase later. Then I chose my watercolor inks that I wanted to use. I wanted the banners to be bright and cheery, so I picked Deep Yellow, Rose and Teal.

I started with the yellow, then pink. I kept my watercolors super light by diluting them with water. I will go back and add more layers of color to shade the banners, but I wanted to start light.
I let the first banner dry as I water colored the 2nd banner. It’s important to let the watercolors dry in between each layer.
In the next step, I painted with more concentrated ink to shade some areas darker. If you reference these styles of banners, the gussets are always darker because less light hits them, and the edges of the pleats are also darker. I also left a small section of the lightest color showing to mimic lighter areas.

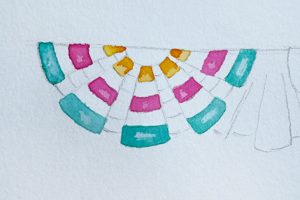
Then I painted the middle, solid banner with Rose ink. Same technique here: the first layer was lighter and diluted with water. I will go back in and add shading after that dries.

Moving on to the second banner, repeat the same steps. It’s nice working between the two; you can let them dry as you work on the other.

Keep painting layers until you get the desired shading you want on the striped banners. Remember to let the pleats dry before water coloring the gussets, or they will run together.
Don’t forget about the center banner as well. Add shading to make the creases darker to show dimension. Once you are happy with them, let them dry completely and erase any pencil lines you still can see.

My last step for the banners is to add a little gray shading the either side of the gussets to give them even more dimension. I mixed a touch of black watercolor ink with lots of water to make a very light gray. I took the #1 brush and brushed a very small gray line on each side of the gussets. I also brushed a small gray line at the top if the banners as the line the banners are hanging on.

Now that the banners are done, I painted a quick ‘Happy Birthday’ watercolor lettered sentiment on watercolor paper.
I used the same colors in the banners and painted the shadow with the Deep Yellow watercolor ink.

Grab some coordinating cardstock and using a paper trimmer, some adhesive and foam dots, create a card for s special birthday!

Make sure to send me one too! As I get older, I need all the birthday love I can get. Haha, I am kidding! I hope you enjoyed this tutorial and give it a go. Be sure to share what you create on social media with #kellycreates – we would love to see your banners!
**********************************************************
Follow Chasity on Instagram for more crafty, lettering inspiration @chiciscre8ive
Shop the supplies Chasity used by visiting the Kelly Creates online store at http://www.KellyCreatesStore.com or find a local retailer HERE. You can also click the images below.


Claudia
July 26, 2022 at 12:55 pm (4 years ago)Thanks for the lovely tutorial!