Chasity is back with a fantastic hand lettered Father’s Day card tutorial! I love the dimension she created with gradient blue lettering and highlights!

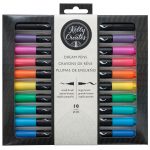
Kelly Creates Supplies: Deluxe Lettering Kit, Watercolor Project Paper Pad, Dream Pens Set 1 and Set 2, Moonlight Marker, Multicolor Bullet Tip Pens
Other Supplies: Paper Trimmer, Scissors, Foam dots adhesive, Baker’s Twine, Patterned paper and card stock.
Hey Lettering Friends! Father’s Day is coming up quickly, and if you’re a last minute person like I am, this is the perfect opportunity to make a handmade card for the the most important dude in your life! And when it’s handmade, it just means more…am I right!?!

Today I am sharing with you a simple and easy Father’s Day card made with Kelly Creates fabulous Pens. I started out sketching a heart shape. I knew I wanted my letters and shapes to form a heart shape, but still be masculine.


The next step is to write the phrase “Happy Father’s Day” inside of the heart, following the shape of the heart.

Then sketch around each letter to make them bold or chunky letters so they can be filled in with blended colours later. The chunkier the better! Keep the integrity of the heart shape while adjusting the letters. I know this doesn’t look super exciting yet, but hang in there!

After you finish with the letters, fill in around the words with dots and flourishes. I sketched these first, then made a few adjustments to fill in the heart. I added some bow ties as well to keep with the theme.

Now that the heart is all filled in, erase the heart outline and make sure it’s filled in enough to still look like a heart. Adjust as necessary. This is my version, but feel free to be creative and change yours up! Now, it’s time to add some color.

Using the Kelly Creates Dream Pen Ocean, I outlined the letters with the small brush side. This gives me a base to work with. Continue this until you have outlined all of the words.
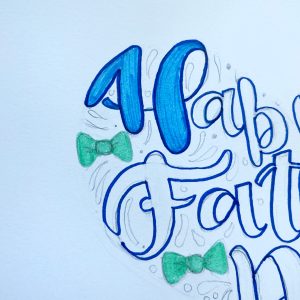
Next I started the process for blending. I blended using the Sky and Ocean Dream Pens. Using the small brush side, I filled in each letter with Sky Blue. I also colored in my bow ties with the Stream Dream Pen.

Then, using the Ocean Blue Dream pen, still the small brush side, I layered the darker blue on top of the Sky Blue using quick light strokes at the top of each letter.
Next, go back with the Sky Blue Dream pen and pull the darker Blue color down. This will create a blended, gradient. As you layer, or go over the Sky Blue, the base layer of that color will become darker. This will create a beautiful blended look between the Ocean and the Sky Blue Dream Pen colors.

Remember that light, small strokes are best; you can always add more color, but it’s harder to take it away. Repeat until all the letters are filled in. Don’t forget the apostrophe in “Father’s”!
You don’t have to use blue, be creative. There are so many beautiful Dream Pen colors! Just be sure to choose 2 in the same color family or that compliment each other when they blend.

The blending of the letters is done and the bowties are colored. Now it’s time to add some color to the details that are still in pencil.
Using the Sunset and Sunshine Dream Pens, color in the flourishes. I knew I wanted to use 2 colors on these so I started with Sunset and then went back and filled in the others with Sunshine.

I did erase the pencil lines before filling in with the Sunshine Dream pen color. It’s such a light color; I didn’t want to see the pencil lines through it. I also used the Kelly Creates Multicolor Bullet tip Pen ‘Waterfall’ to outline the bow ties. I then went back and added another layer of the Kelly Creates Stream Dream Pen to create darker areas of the bowties to add some dimension.

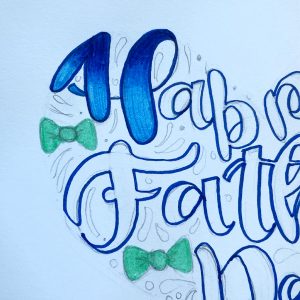
Here is how it turned out. I still thought it needed a little more dimension, so I went to my trusted Kelly Creates Moonlight Marker and added highlight strokes on all of the flourishes and letters. I really love how this added just the dimension this piece needed, and this is one of my favorite go-to markers!
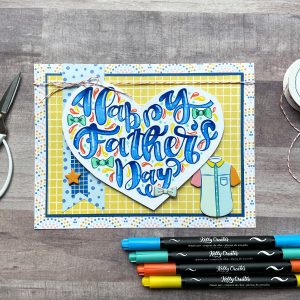
Now the fun part! I fussy cut around the heart lettering and added some foam dots to it to create a card. You can use any pattern paper and embellishments you have. I used Obed Marshall’s “Buenos Dias” Collection because the colors matched perfectly! I added a few yum yums to my card, some Baker’s twine and it’s done.
I am so excited to give this card to my hubby this weekend. He does so much for our family, and I really do owe him so much gratitude.
Happy Father’s Day to all the dads out there! Hope your day is amazing! Please share your cards with us; we would love to see what you create! Thanks so much for stopping by today!
For more lettering and crafty inspiration, follow Chasity on Instagram @chiciscre8ive
*******************************
Shop the supplies Chasity used at http://www.KellyCreatesStore.com or click the shopping links below.