
Stephanie (@simplystephlettering) is an expert at drop shadows…let’s learn how to make your lettering pop with dimension with this technique!

There are many different techniques you can apply to lettering. One of my favorites is a drop shadow. It is one of the first “embellishment” techniques I learned with lettering, so I am going to share my way of learning it with you! 
Kelly Creates Supplies: Blank Practice Pad, Dream Pens set 1, Dream Pens set 2, Black Fineliners
When deciding on colours, choose a darker pen for the bulk of your lettering, or the main lettered word, and a lighter color for your shadow. You can pick colors that are within the same spectrum or opposing colors, just as long as your shadow color is lighter. (NOTE: Sometimes shadows are black, but I usually use a lighter ink for mine)
First, I used my Midnight Dream pen to letter my word ‘shadow.’

Now, when you look at your word, and are trying to determine where to place your shadow lines, I want you to ask yourself: “Where is the light coming from?” For shadows to appear, there needs to be a light source, and something blocking that light source to create a shadow. Our “light blocker” in this case is the lettered word.

One way I like to figure out the direction of my light source is to draw little suns in the top left-hand and right-hand corners of my paper using my fineliner with arrows pointing towards the lettered word.

I will show you an example of a shadow from both directions, but first, let’s focus on a shadow with the light source coming from the top left-hand corner of the page.

If the light is shining down on your word from the left, the shadows will all be to the right of your stroke. To create my shadow, I used my Stone Dream Pen (from the Meadow set 2). TIP: You could also use a Multicolor Small Brush pen to draw thinner shadows.

Follow your shadow strokes to the end of the word. Consistency is key! To create a shadow that “makes sense”, be sure to stay to the right of each up and down stroke, based on the direction of your light source.

The same technique is performed with a light source coming from the right, except all shadows will be to the left of your up and down strokes. 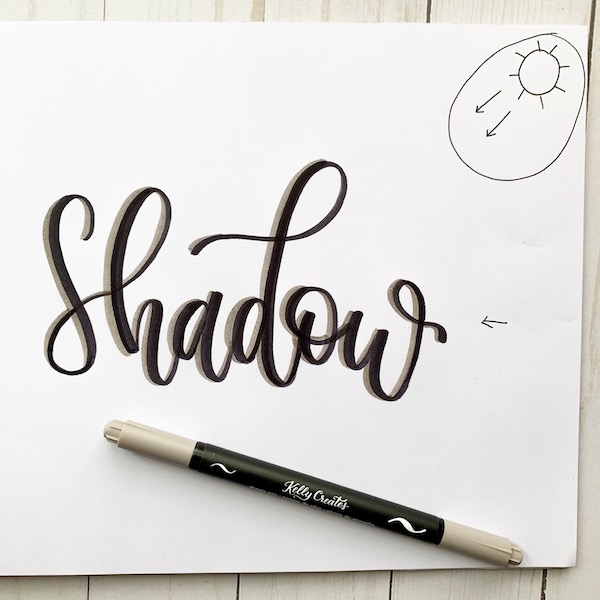
Practice makes progress! Experiment with different colors and light sources!
Thank you, Stephanie, for breaking the shadow technique into simple steps we can easily follow! For more lettering inspiration from Stephanie, follow her on Instagram @simplystephlettering and her Facebook page Simply Steph Lettering.
To shop for supplies Stephanie used, click on the affiliate shopping links below:


Save these lettering ideas on Pinterest with this image below:

Bonnie
June 30, 2019 at 1:11 pm (5 years ago)So good Stephanie. I love adding shadows to my lettering. Great explanation.
Neeta
June 30, 2019 at 8:50 pm (5 years ago)Thank u.. thats very helpful
Lia Hansen
March 25, 2020 at 12:35 pm (4 years ago)Thank you Stephanie!