
Chasity (@chiciscre8tive) is showing off her scrapbooking skills today with the NEW Kelly Creates Ink Pad & Stamp Block set, rub ons, Galaxy washi tape and Specialty Paper pad!

Kelly Creates Supplies: Rub-Ons, Specialty Paper Pad, Galaxy Washi Tape Pack, Ink Pad and Stamp Block Set, Mandala Stamp Set
Other Supplies: 2 sheets 12”x12” White Cardstock, Adhesive Runner, Paper Trimmer, Embellishments of Choice (adhesive gold glitter dots), 1” and 1 1/2” Circle Punch
Have you seen the BRAND NEW products from Kelly Creates?!? I love how Kelly has expanded her line to include new items that not only work with her entire line of pens, but also are staple products to the paper crafting world. As a scrapbooker at heart, I was so excited to sit and play with the new Kelly Creates releases! (***See affiliate shopping links at the end of this post).

I am in love with the new Specialty Paper Pad and Galaxy Washi Tape. GIVE ME ALL THE WASHI TAPE! These both feature beautiful watercolor and galaxy patterns with gold accents. Kelly’s rub ons feature her lettering plus icons and transfer like butter. They are perfect for layering. The new Ink Pad and Stamp Block Set is wonderful for stamping both decorative stamps and word stamps for tracing.
Today, I created a simple layout with these fantastic new products. Since all of these coordinate, it’s really easy to make stunning layouts, cards and more. 
From the Specialty Paper Pad, I chose the pink and yellow watercolor galaxy background paper with the mandala. I needed both sheets in the pack to obtain this look. This wonderful colorful background looks like I painted it myself. This Specialty Paper pad is full of pretty and eye-catching backgrounds for hand lettering and card making too. I also used my electronic die cut machine to cut 3 hexagons to create some interest later on my layout, but you can just cut these by hand.

The base for my layout is a 12×12 white cardstock. I created a subtle pattern on the white card stock with the Kelly Creates Mandala Stamps and Ink and acrylic block set. Using the light grey ink, I stamped the Mandala Stamp around the page, and let it dry. This ink is quick drying so I didn’t wait long.


Once the stamped images are dry, adhere the Specialty Paper to the background using a tape runner or other adhesive.
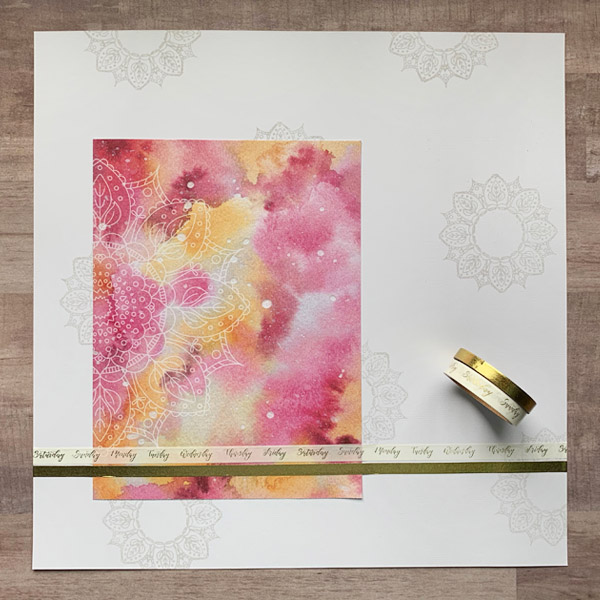
Next, choose the Washi Tapes you like and place them across the layout. I chose the days of the week and the gold. The gold washi tape is stunning and really shimmers, drawing the eye to the focal point of the layout.

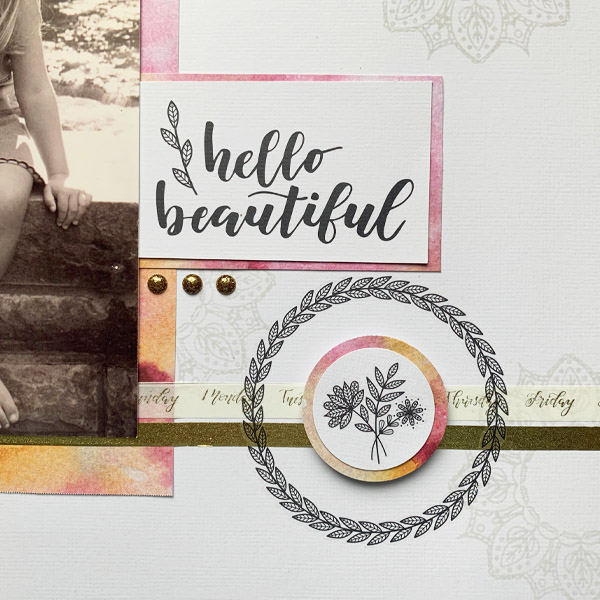
I layered a variety of rub ons onto the layout. I cut out the rub ons and played with placement until I was happy with the look. I have always been a huge fan of rub ons, and this set is such good quality. Once you have placement figured out, peal the rub on from the paper backing and position on the background.

Use the stick included to burnish the rub on and transfer it to the paper. Carefully lift the top paper slowly to make sure the rub on has transferred completely. Rub ons are very forgiving. If you have a section that hasn’t transferred, just place the top paper back down and continue to burnish. 
As you can see the layout is starting to come together. I really love how all the products coordinate, making the design easy peasy.
Next, I wanted to add an embellishment inside the circle rub on, so I chose the flower design. I rubbed this on to the extra white cardstock, then punched it out with a 1” circle punch. I then punched a 1 ¼” circle from the pattern paper and layered the two pieces. (NOTE: If you don’t have a circle punch then just cut a circle freehand or use a circle template with a pencil and then cut around it following the line)


One great feature of rub ons is you can layer them! I added the circular rub on over the pattern paper and the background paper to pull them together. As you can see, it transferred seamlessly.
Next, I adhered my photo to the layout and I chose the rub on that says “hello beautiful” in Kelly’s writing as my title for the layout and added a leafy branch rub on.


I wanted this to stand out a little, so I burnished the rub on to a separate piece of white cardstock and adhered it to a mat cut from more Specialty Paper with a ¼” border. I placed the title to the right and slightly behind the photo. 
To create a visual triangle with this layout design, I added a pop of color with my hexagons, and then adhered some gold glitter dots to the washi tape as the finishing touch.

I finished this layout in under an hour, which for me is saying something! I love recording moments and being creative, but I also don’t have a lot of time every day to do paper crafts. Give the stamping and rub ons a try…you’ll love them as much as I do! Be sure to share your layouts with us… we would love to see what you create with Kelly’s products in her Facebook group or Kelly Creates Studio Facebook page. Thanks for joining me today!
Thank you Chasity for making me want to pull out some photos to scrapbook. I don’t have much time these days either for crafting, and you made me realize that with the right supplies and a simple design, I can be creative too.
For more crafty inspiration and ideas, follow Chasity on Instagram @chiciscre8tive
Shop the supplies by clicking on the affiliate shopping links below:


Kim Gowdy
March 9, 2019 at 9:51 am (5 years ago)NICE!!!! I Love seeing these products in your Kelly Creates line ?
Linda Epstein
March 9, 2019 at 12:33 pm (5 years ago)Great tutorial and the love the project. I’m looking forward to getting some of the galaxy products too. Thanks for sharing this.
Scrappinher aka Jeri Swenson
March 11, 2019 at 5:21 am (5 years ago)So gorgeous! I love the layering you did with rub-one.