
Chasity is going to show you how to make adorable home decor to celebrate Easter and Spring by creating a watercolour bunny banner!

Kelly Creates Supplies: Watercolor Practice pad, Watercolor Lettering Project Pad, Deluxe Lettering Kit, Watercolour Inks Set 1 and Set 2, Lettering Brushes, Daisy Palette, Black Fineliner
OTHER SUPPLIES: bakers twine, hole punch, assorted yarn, pom pom maker, die cutting machine(optional), scissors, silicone mat

Spring is upon us in Utah, and we are loving the spring blooms! Who is getting ready to celebrate Easter? As you know, I love decorating for seasons and holidays, and today I am going to show you how to create a watercolor bunny banner inspired by the most loved Easter candy aside from the jelly bean– PEEPS! With just a few Kelly Creates supplies, you can make this fun, whimsical banner to hang in your home.
I designed SVG and PDF files for the bunny. If you have an electronic Die Cutting Machine, the SVG file will allow you to quickly cut the bunnies out. (CLICK HERE to download the SVG file from Dropbox) Please note that I used Kelly’s watercolor paper which is very thick, so I set the machine for a deep blade depth and had it cut twice. Follow your cutting machine instructions. If you don’t have a machine, no worries! Just print out the PDF version, cut out the bunny shape and trace it onto the paper. Click HERE to download and print the PDF of the bunnies template or click the image below.

I cut out 11 bunnies. You can use as many as you want depending on how long you want to make your banner and where you will hang it.

After I cut the bunnies, I gathered my supplies. I used a WRMK silicone mat for painting. I love this mat because it protects my table and wipes up super easy. I added my Kelly Creates watercolor inks to my daisy palette and got to work!


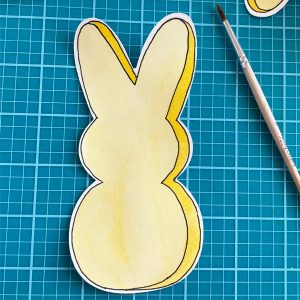
I wanted the bunnies to look a little dimensional. To achieve this, I used my pencil and drew the “side” of the bunny. I drew this on the right side of the head and body, but also on the right side of the left ear. You don’t have to do this step and they would be just as adorable.
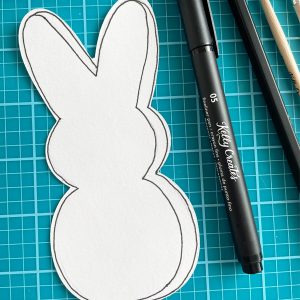
Once I was happy with the lines, I used a Kelly Creates black Fineliner 05 pen to draw in the lines, so they stood out. My favorite feature of Kelly’s Fineliner Pen is that they are permanent and do not bleed when you add watercolor over them! So this step can be done first.
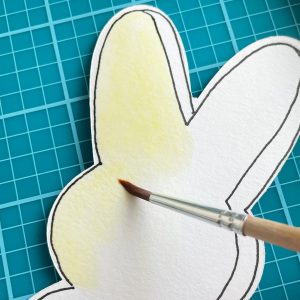
Now it’s time to start painting with all the pretty Kelly Creates Watercolor Inks. I chose to use Rose, Deep Yellow, Teal and Violet Watercolor inks for my bunnies. These are traditional PEEP colors. You can really use any of Kelly’s Watercolors and have some fun! As you know, Kelly’s watercolor inks are very pigmented, so I had to add a lot of water to dilute them to achieve a pastel color. Add water to the inks in the daisy palette and mix until you are happy with the hues. Keep in mind that you will paint the “side” of the bunny with a slightly darker color, so paint the front of the bunnies light.

I used Kelly’s #4 lettering brush to paint the front of the bunnies. I repeated this same process through all the colors I wanted for the banner. Be sure not to paint the “sides” as we will come back to that later.
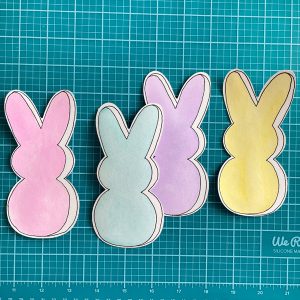
Once I painted 1 of each color and liked the results, I painted the rest of the bunnies that had outlines.
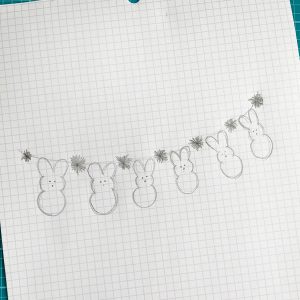
Set the bunnies aside and let them dry. While they were drying, I did a quick sketch of how I wanted my finished banner to look using my Deluxe Lettering Kit and Grid Watercolor Practice paper.
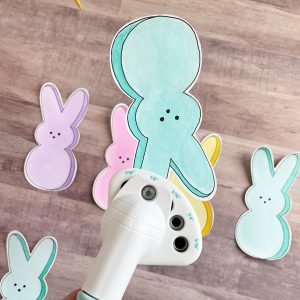
Once the bunnies are dry, it’s time to paint the dimensional sides with shades darker than bodies. Paint the darker “sides” on each bunny and set aside. If you didn’t add the “sides”, you can skip this step.
Once they are dry, if the paper is wavy or ‘warped,’ you can stack the bunnies and put something heavy on them(like some books) for a few hours. This will flatten them out. Kelly’s watercolor paper is thick, so I find that it holds its shape really well.

Now it’s time to add the face details. Again, I used Kelly’s black Fineliner 05 pen and drew circles for the eyes and mouth. Repeat on all of the bunnies.

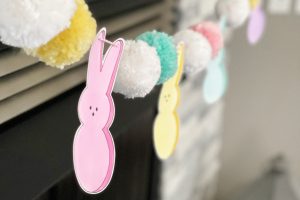
The next step is to include pom poms in your banner by buying some or making your own. You can find Pom Pom makers online or at any craft store. I used a WRMK pom maker. Follow the directions to make the Pom Poms. It’s a fairly easy process. I used yarn colors that coordinated with the bunnies I just made.


I made enough pom poms to have one on each end and 2 in between each bunny. Once the Pom Poms are complete, grab some yarn or Baker’s Twine and let’s string the banner together. I used a large plastic needle to string the Pom Poms on the banner, but any needle you have will work!

Using a hole punch, punch a small hole in each of the bunny ears so you can string them onto the banner string.I used the WRMK Paper Punch which can punch 5 different hole sizes Then I laid the bunnies and Pom Poms out on my table in the order I wanted them and just added them to the twine.

And that’s it! You now have a cute Easter Bunny Banner to hang in your home! If you don’t want to make a banner, you could use the bunnies for cards, layouts, or other projects. They are so fun to make!

Here is my banner hanging on my mantle.
I hope you share your projects with us on social media using the hashtag #kellycreates! We would love to see what you create. Thanks for stopping by today!
*******************************************
For more crafty inspirational projects, follow Chasity on Instagram @chiciscre8ive
To shop the supplies Chasity used, visit my online store http://www.kellycreatesstore.com or click the images below. Click HERE to find a retailer near you.


Easte
Claudia
April 12, 2022 at 6:37 am (4 years ago)Very cute!🐇🐣🌸🌷
Mary Guerra
April 13, 2022 at 2:48 am (4 years ago)It is amazing and cut . My family love ❤️ it.
Tiffany Spaulding
April 13, 2022 at 5:23 pm (4 years ago)Peeps are my favorite. Thanks for creating and sharing this super cute project!