
Chasity has a ‘RED HOT’ lettering tutorial for you today, just in time for Valentine’s Day!

Kelly Creates Supplies: Watercolor Inks Set 1 and Set 2 and Set 3, Black Fineliners, Deluxe Lettering Kit, Lettering Brushes, Watercolor paper, Daisy palette
Hey Lettering Friends! It’s February! It’s officially the month of love! It’s bitterly cold here in Utah, but it’s the perfect time to snuggle with the ones you love.
Today I am bringing you a tutorial loosely inspired by a Valentine’s candy, Red Hots! I created a cute lettering piece that is perfect for any project. Add this to a scrapbook page for a title, put it in your planner or art journal, or make a loved one a handmade card. This is also fun to make as a framed home décor product. Let’s get started.

I used Kelly Creates watercolor paper. I sketched out the words “Red Hot Love.” My lettering was inspired by the Red Hots logo, but you can sketch any letters that can be filled in. Red Hots are cinnamon hearts candy.
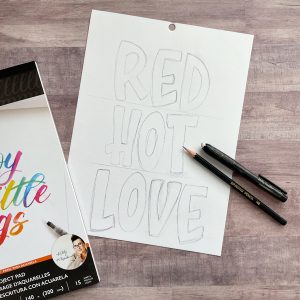
Then I drew some “Red Hots” in the love letters. I wanted them to look like they were falling to the bottom of the letters.

If you would like a template for this lettering, click HERE or click the image below to download and print.

Once you’re happy with what you have sketched out, it’s time to add some color. I used Kelly Creates Watercolor Inks – Poppy, Rose, Black and White with the #1 and #4 lettering brushes to complete the project. Starting with the Poppy Watercolor Ink, fill in the Red Hot hearts.

I was careful to fill in every other heart, so they didn’t bleed together. Once those are dry, paint the rest of the hearts. If you don’t have these Watercolor Inks, this can be done with any of Kelly’s pens!

Let those dry. Once dry, outline each tiny heart with the Kelly Creates Black 005 Fineliner. Next, using the same #1 lettering brush and the Rose watercolor, carefully outline each letter in the word ‘LOVE’. The fine tips of the Kelly Creates lettering brushes are wonderful for detailed work like this. If you’re not comfortable doing this with watercolor ink, again, use Kelly’s pens to outline the letters! Keep outlining until all the letters in the word love are done.
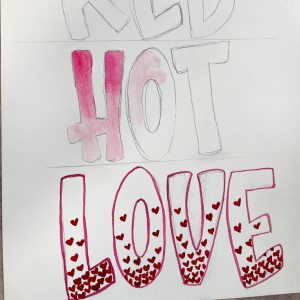
Now move on to the words ‘Red and Hot’. For these I wanted an ombre effect. I achieved this by adding water to the entire letter to “prime” it for blending. Starting at the top of the letter, add your Watercolor Ink and blend downwards. I used the #4 brush for this since the letters were larger.

Add more color to the top of the letter until you are satisfied with the Ombre. Repeat this process for each letter.

Once those letters are done, repeat the process with the letters of ‘Red’. I changed colors and used Poppy. Let all the letters dry completely. Then go back with an eraser and erase all of the pencil lines from your sketching.

The next step is to add dimension with shadows and highlights to help the letters pop off the page. I used very little Kelly Creates black watercolor ink and diluted it with water until it was a very light grey. Then I added the shadow to each letter using the #1 brush. Using the same size brush, I painted white highlight lines and dots at the top left inside edges of each letter with the Kelly Creates White Watercolor Ink (Set 3). NOTE: This white ink is a thicker gouache which you can dilute with water or not.
Finally, I outlined the words ‘Red and Hot’ with the 01 Fineliner pen. The project is complete! Use it as a card for your loved ones or as a home décor piece.

Thanks for stopping by today! And I hope that you give this tutorial a try! If you do, be sure to post it in Kelly’s group so we can see your beautiful work! Wishing you a Happy Valentine’s Day filled with love and chocolate!
*********************************************************
For more lettering and crafty projects, follow Chasity on Instagram @chiciscre8ive


