
Want to make some unique cards for Dad? I guarantee you will be craving a cool treat after Chasity’s ‘bomb’ Father’s Day card making tutorial!

Kelly Creates Supplies: Watercolor Inks Set 1, Set 2, Set 3; daisy palette, lettering brushes, Dream pens, moonlight marker, Watercolor Paper pad, Multicolor Bullet tip pens, Black Fineliners, Small Brush pens, Deluxe Lettering Kit
Other Supplies: Card stock, twine, paper trimmer, adhesive, silver sequins
Hey there Lettering Friends! How have you been? Hope that you are doing great and finding some time to relax and practice some fun lettering! I want to share a watercolor tutorial that is easy and cute and can be made into a great Father’s Day card! It’s heating up here in Utah, and it makes me want all the popsicles!
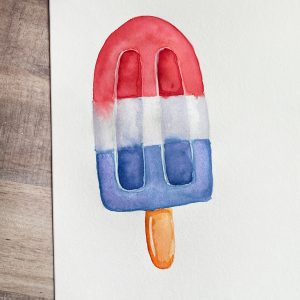
My favorite popsicle as a kid was the infamous ‘Bomb Pop.’ The red, white, and blue popsicles were a staple in our house in the hot summer months. For these watercolor cards, I used a fun play on words for Father’s Day “You’re the bomb, Pop!” but you could also use “Coolest Dad” or something similar. Today I will share two versions of the watercolor card. One is a little more playful and the other a little more traditional. I hope you give them a try. Gather your supplies and let’s create!
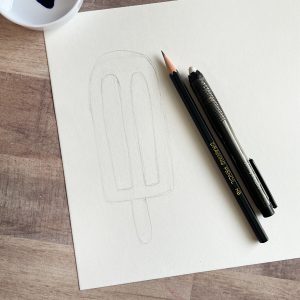
Using Kelly’s watercolor paper, sketch out a popsicle, either the traditional version or the whimsical one.

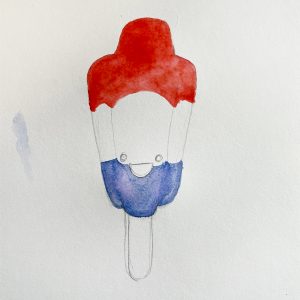
Next, using Kelly Creates Poppy and Blue Watercolor Inks, start to paint the popsicles on the top and bottom, leaving the center area uncoloured for now. I used the #4 brush to fill in the larger sections. I let these dry well before moving on. Since I was working on 2 cards at once, it was easy to work between the two cards, back and forth, and let them dry.

It doesn’t matter which watercolor ink you start with. You can even reload your brush with color while it’s wet and add more color to areas that would be darker. This is a great way to make them more realistic.
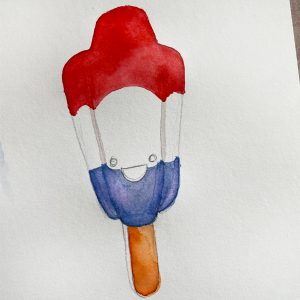

I mixed Orange and a tiny bit of Black watercolor inks and painted the sticks of the popsicle. I added a bit more color while it was wet to the left side to create a shadow.

I did a bit more shading on the first popsicle. I pre-wet the white section of the popsicle and only used a little Black and a bit of Blue watercolor inks diluted with water to make a very light blue/grey hue. I wanted to just add some shading while keeping the area mostly white. I did a base coat of this light blue/grey and let that dry. As you can see, it’s very subtle.
For the more whimsical version, I used the #2 brush and painted a thin line of the blue/grey to create subtle shading on the popsicle to add some dimension.
OK, how is it coming together so far? For the more realistic version, add some shading/ darker colors to the indents on the interior of the popsicle. If you want some bleed to look like your popsicle is melting, don’t let the colors dry between coats. Remember to use color very sparingly in the middle ‘white’ area. These Kelly Creates Watercolor Inks are very pigmented, so start with diluted colors and layer more paint as needed.

Next I added some highlight lines with the Kelly Creates White Watercolor Ink to add some dimension to the left sides of the popsicle indentations. And I also added a small line to the stick. I painted the white highlights when the popsicle watercolor was dry.
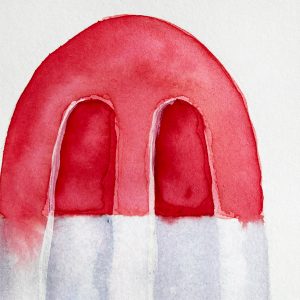
Here are some close-ups of the shading and white highlights added for your reference.
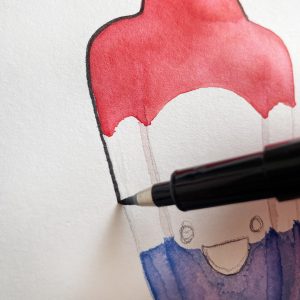
If you are working on the more whimsical version, it’s time to grab some pens from your stash and do some outlining! I used the Small Brush Pen Midnight to outline all of the edges on the popsicle. You could also outline with a Kelly Creates Black Fineliner.
Remember to also outline the stick as well. Then fill in the eyes and mouth with the same pen. If you want to add a tongue, now is the time!

To add the white to this popsicle, I drew a few strokes down the left side with the Moonlight Marker to add light and finished off the stick with a slightly darker color to add dimension. (Just add a tiny bit of black to the color used on the stick.) I also added white Moonlight Marker to the center of the eyes as well.
Let’s make these into cards! Next step is to add some lettering to the popsicles. For the traditional version, I added my lettering and slightly overlapped the watercolor!

I alternated the red and blue lettering using the Ocean Dream pen and the Hibiscus Bullet tip pen (or Fire Multicolor Fineliner).
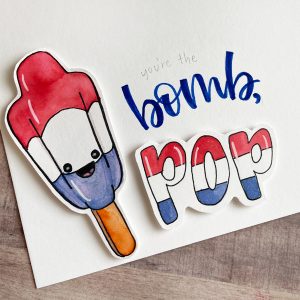
For the whimsical version, I fussy cut the popsicle, and using the leftover watercolor paper, I sketched the letters for POP in a simple block lettering ‘cartoon’ style.

I repeated the steps in the letters to mimic the painted popsicles. Paint with the Poppy and Blue Watercolor Inks, outline with the Black Fineliner and add some white!

Once that is dry, fussy cut that out of the watercolor paper. Add some foam dots to the back of the popsicle and the word.

I placed them on Kelly Creates Watercolor paper, but you can use regular white cardstock if you prefer.
Once these are adhered to the card base, decide where you want to place your words and pencil them in. Then using your Kelly Creates pens, show off your lettering skills! I used the Dream Pen Ocean and the small brush Pen Hibiscus for my lettering. Then if you desire, use the Moonlight Marker line to add some highlights!
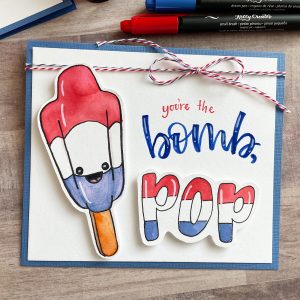
To finish off the cards, layer them on cardstock, add some baker’s twine and you have your Father’s Day homemade card!
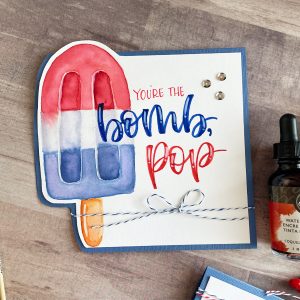
For the more traditional card, I did some fussy cutting around the popsicle before mounting it on the cardstock. Add some Baker’s twine and sequins and you’re done!

Thanks for stopping by today! I hope you enjoyed these cards, and I really hope you give them a try. Please be sure to share them with us on social media using the hashtag #kellycreates. We can’t wait to see what you make!
******************************
For more crafty lettering inspiration, follow Chasity on Instagram @chiciscre8ive.
To shop the supplies Chasity used, visit my online store at http://www.KellyCreatesStore.com or click HERE to find shops around the world that carry Kelly Creates products.
Cathy Cosgrove
June 10, 2022 at 9:13 am (4 years ago)These cards are adorable, Kelly! Your clear instructions make this a very doable project. 👍