
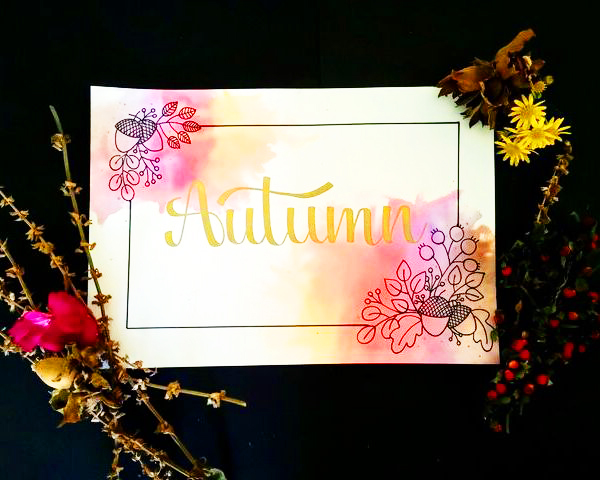
Gemma Hobson, our guest artist (@lettersflowersandtea), is back with some beautiful florals, hand lettering and a watercolor background perfect for Autumn!
Are you missing summer? It seems Autumn has arrived! Here in England, it’s the time of year where no one knows what to wear, which is always quite amusing! Personally, autumn is my favourite season…cosy knits, my favourite TV shows, hot chocolate and beautiful changing colours. The latter is what I am bringing into my tutorial today as I go through a step-by-step guide on creating an eye-catching Autumn themed frame using some of my favourite Kelly Creates products.
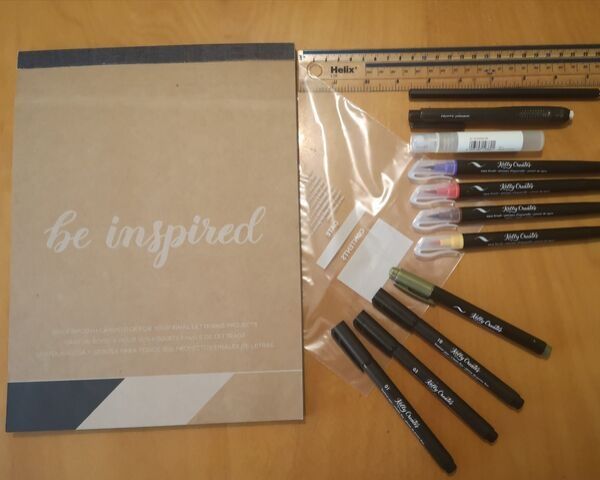
Kelly Creates Supplies:
- Plain white cardstock from the Project Pad
- Eraser and pencil from the Deluxe Lettering Kit
- Earth, Fire, Lilac and Sunshine Aqua Brush Pens
- Black Fineliners 01, 03 and 10
- Gold Small Metallic Jewel Brush Pen
- Tracing Paper Pad
Other Supplies: Ruler, Small Water Spray Bottle, Clear Food Bag
 Using a piece of white cardstock from the Kelly Creates Project Pad (I used half a sheet) very lightly draw a rectangle with pencil and ruler which will act as the main frame. As you’ll be adding illustrations, leave enough room in the corner for these, as well as leaving space in the middle for your lettering. As a guide, I have drawn my frame about 2cm (1 inch) from the edges of this piece of paper which measures about 8″ x 5″. TIP: You can also use smooth watercolor paper or Bristol Paper.
 To create the watercolour effect in the corners, brush a swatch of Kelly Creates Earth, Fire, Lilac and Sunshine Aqua Brush pens onto a clear food bag. I purposefully haven’t taken the pen to the edge of the bag, so some room is left for the colour to ‘splodge’ out as opposed to leaving a solid line. TIP: Place the food bag on a piece of white paper so the ink colours are visible OR cut a piece of white paper and place it inside the bag.
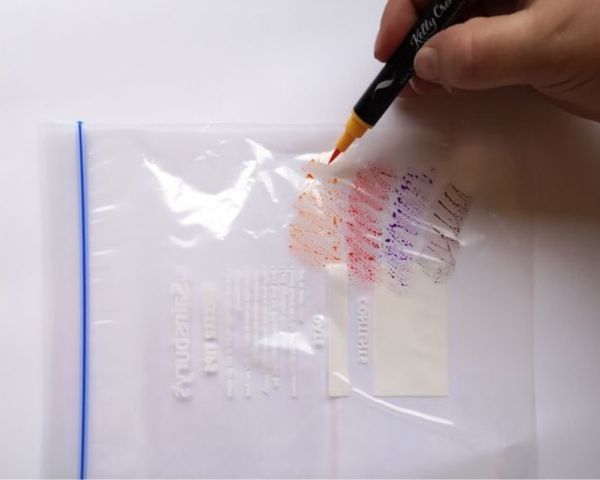 Next spray your bag with a water spray, I’m quite liberal with the water as I like the colours to blend together! You can practise on some scrap paper first and experiment with the amounts of ink and water until you find a combination that you like. TIP: You could also spray your card stock or watercolor paper.
 Place the bag over the bottom right hand corner of your frame and carefully rub the bag in a circular motion to blend the colours and transfer them onto your card stock.

The fun bit is never really knowing exactly how it will turn out! This should only take a few seconds. As the bag is clear you can see when it is time to stop and lift it up. TIP: Make sure you are on a waterproof surface and have some paper towel or cloth handy! You can dab away any excess water.
 Repeat for the top left-hand corner but make this a smaller area. To avoid unnecessary plastic waste, you can wipe the bag clean and use again and again!
 Let your card stock dry completely. To avoid any potential warping, you could place something heavy on the edges if you wish or secure the paper to a hard surface with removable tape before you begin this watercolor technique.
 Now to add the autumnal illustrations to the corners of your frame. Draw a larger design in the bottom right hand corner and smaller design in the top left. You can lightly pencil your design first, so you get a feel for where you want each object to be.
 Here are some drawings you could incorporate into your design.
 I tend to centre the larger flowers or acorns, and then use the leaves or berries to form the shape of the corners.
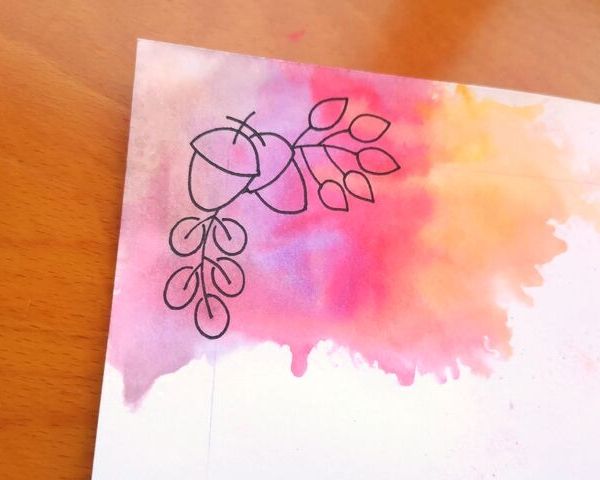 Go over your illustrations with Kelly Creates black fineliners. I have used Kelly Creates black fineliner 03 and then used 01 for the finer details.
 As if by magic, your drawings are already filled with lovely autumn colours! Remember to erase any pencil lines when the ink is dry.
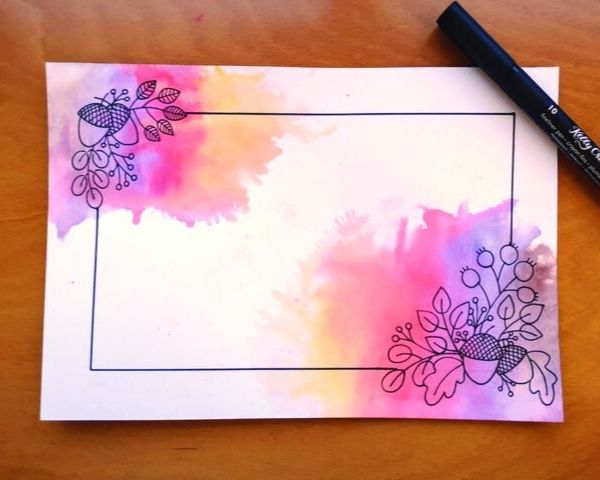
 Now go over the parts of the line frame that are remaining with Kelly Creates 10 Black Fineliner.
 There your frame is complete! Now it’s time to add your lettering.
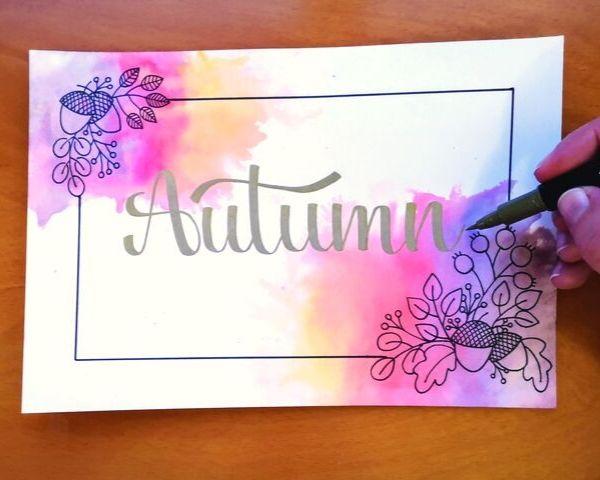
 You can write “Autumn” like I have, or maybe try a name, a message or a quote. Decide what you want to write before you draw the frame to make sure you have enough room for it to fit. TIP: Use Kelly Creates Tracing paper to mock-up some design ideas and place over your frame background to make sure you are happy with the size and look of your lettering.
 I have written Autumn using the Kelly Creates Gold Metallic Jewel Small brush pen. I am seriously in love with this set, and they write so beautifully over the watercolour background.
You could use this technique on a birthday card, in a journal, planner or as a print to frame. I hope you enjoy this tutorial and have a go yourselves; I’d love to see what you create.
Gemma makes these pretty floral projects seem so easy! I’m really grateful that she is sharing her illustration samples with us so we can give them a try.
For more lettering and art inspiration, follow Gemma on Instagram @lettersflowersandtea
Shop the supplies Gemma used by clicking the affiliate shopping links below or visiting my online store KellyCreatesStore.com :


PIN ME!

Chasity
October 18, 2019 at 10:43 am (7 years ago)This is SO FUN! Can’t wait to try this!
Linda Epstein
October 20, 2019 at 4:15 pm (7 years ago)This is beautiful, Gemma, and a great idea. Thanks for sharing this.