
Chasity (@chiciscre8tive) is a card making expert and will show you how to make some cool galaxy themed cards.  SUPPLIES from Kelly Creates: Rub Ons, Galaxy Specialty Paper Pad, Project Pad, Bouncy Traceable Celebration Stamps, Galaxy washi tape, Ink pad and stamp block kit, Aqua Brushes, Moonlight Marker, Black Brush Pens 3-pack, Deluxe Lettering Kit,
OTHER SUPPLIES: watercolor paper, water brush (or paint brush), adhesive, trimmer, silver pigment ink pad, silver embossing powder, heat tool, scissors, sequins, twine/ribbon

CARD 1: I started out by sketching the word “MAGIC” on watercolor paper with the Kelly Creates pencil and ruler from the Deluxe Lettering Kit. Choose any sentiment or word that suits the occasion.
 Next, take the Kelly Creates Fine Brush Pen from the 3 pack of black Brush pens, and outline the letters. Then erase the pencil lines.
 Decide what colors from the Aqua Brushes set you would like to use to create the Galaxy effect. I used Jungle, Ocean, Lilac, Sky and Blossom. Fill in the letters with these colors randomly.
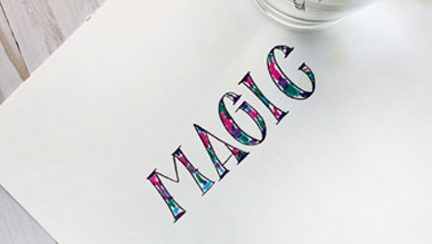
Now, the fun part happens when you add water to the colors! Using a fine tip paint brush (or water brush), add water to the inside of the letters and blend the colors together. Kelly Creates Aqua Brushes blend beautifully when mixed with water, especially on watercolor paper. Also, the water-based black brush pen outlines will soften and blend a little when in contact with water to create cool, darkened edges. 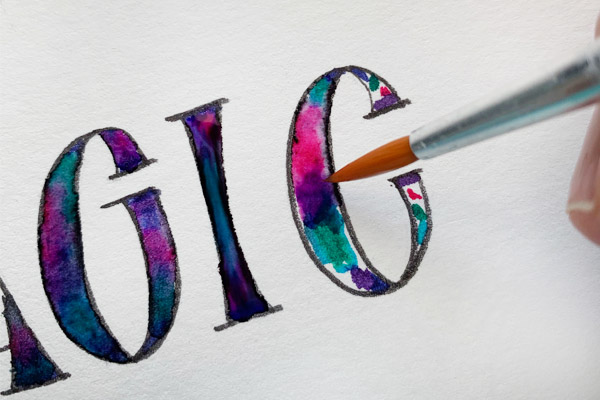
Let this dry completely. (TIP: To speed up the dry time, use a heat tool.) Next step, load your brush with clean water, and tap the brush over the word to sprinkle small droplets. Let this sit on the paper for a minute. The water will absorb some of the paint, and then blot dry with a clean paper towel. This is a great technique to give you even more range of colors and depth to your galaxy.
 Allow that to dry as well. Then take your Kelly Creates Moonlight Brush Pen and create “Stars” by placing random dots within the letters. Vary the size and spacing.
 Next, use the same Kelly Creates black fine brush pen to outline the letters again to sharpen the image.
Next we add lettering. Choose some rub on words that complete your sentiment. Cut them out and place them on your cardstock. Kelly Creates Rub Ons are great for adding lettering without the work! Use the stick that comes in the package to burnish the Rub Ons in place. 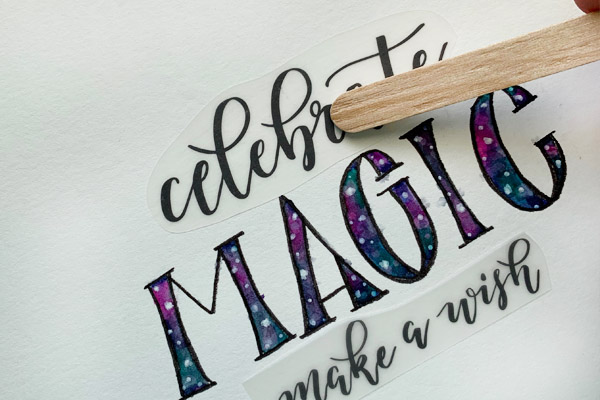
Lift the top paper slowly. If the rub on is not completely transferred, simply place the paper back down and burnish again.

Then cut your watercolor paper to the desired size and mount on a piece of patterned paper from the Kelly Creates Galaxy Specialty Paper Pad. I chose a 6” x 4” card. Once that is also trimmed, adhere to the card base. Add embellishments of your choice to the card to give it a finished look. I added Kelly Creates Washi Tape, purple jute and a few sequins from my stash.
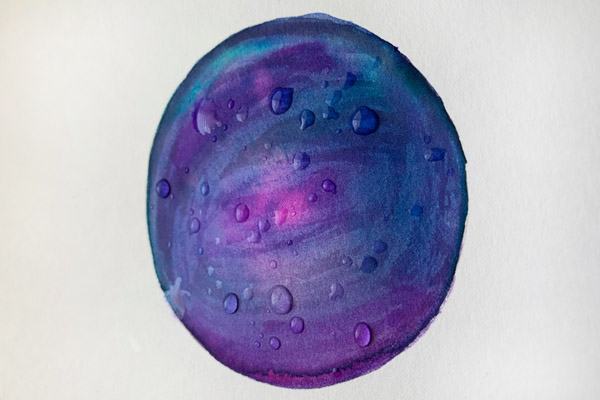
CARD 2: Using the same technique from card 1, begin with a pencil circle on watercolor paper. Create the same Galaxy painting technique with Aqua Brushes and water. 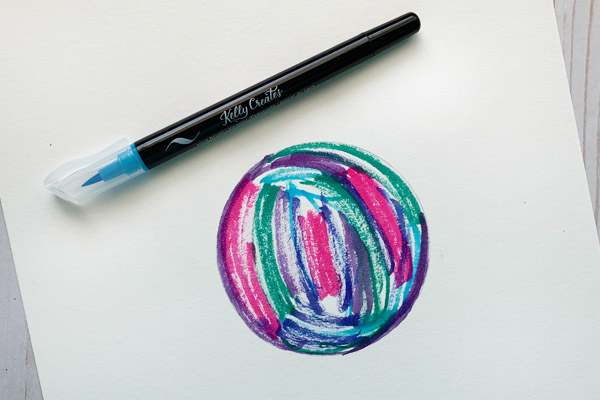
 Use the same technique with the water droplets and Kelly Creates Moonlight Brush Pen to create your galaxy ‘starlight’ appearance.

For this sentiment, I decided to use the Kelly Creates Bouncy Celebrations stamp that says “Thank You”. Kelly’s Acrylic Stamping Blocks are perfect for this because you can see exactly where the stamp will be placed, so lining up your images is a snap!

I wanted to emboss the sentiment to really make it pop off the card. This is accomplished using silver pigment ink and silver embossing powder with the Heat Tool.

Trim this card to desired size. I chose a 5×5 square card. I added the Jute and sequins to the card to finish the look. I also used Kelly Creates Washi Tape to decorate the envelopes so they coordinate.  CARD 3: This card starts the same way as card 2….with a circle and creating the galaxy look with the techniques from the previous cards. It’s getting fun now, right?!?

Follow the same steps as Card 2. The only difference is I cut out the galaxy circle and then mounted it on the galaxy paper from the Kelly Creates Paper Specialty Paper Pad. Using the Silver Pen from the Kelly Creates Metallic Jewel Bullet Tip Pen set, I hand lettered ‘Thank you’ in the center. I love the versatility of the Kelly Creates pens… they allow for all kinds of creative lettering!

I hope you enjoyed this tutorial and try to create this galaxy effect! This was a really fun way to stretch my products and my creativity. Be sure to share your galaxy creations with us in our Facebook group or the Kelly Creates Studio Facebook page.
These Aqua brush pens are magic in your hands, Chasity! Those galaxy colours are indeed ‘out of this world’ !
For more crafty inspiration and tips, follow Chasity on Instagram @chiciscre8tive
To shop the supplies in this tutorial, click the follow affiliate links below:


Pin Me!

Kathy Jo Wood
April 14, 2019 at 2:51 pm (7 years ago)Love the cards! They are out of this world!
😀
Thank you for sharing!
DAYNA YVONNE JACKSON
April 14, 2019 at 2:58 pm (7 years ago)Fun fun fun cards & I love the matching envelope!
Linda Epstein
April 15, 2019 at 10:40 am (7 years ago)Love this tutorial. I haven’t been too successful with galaxy techniques before, but I will try again using these ideas. Thank you so much, Chasity, for sharing these wonderful card ideas.