
Stephanie @simplystephlettering is brightening our blog today with a vibrant, rainbow hand lettering design! She uses Aqua Brushes in ways I’ve never tried before to create a gorgeous, colourful blending effect.
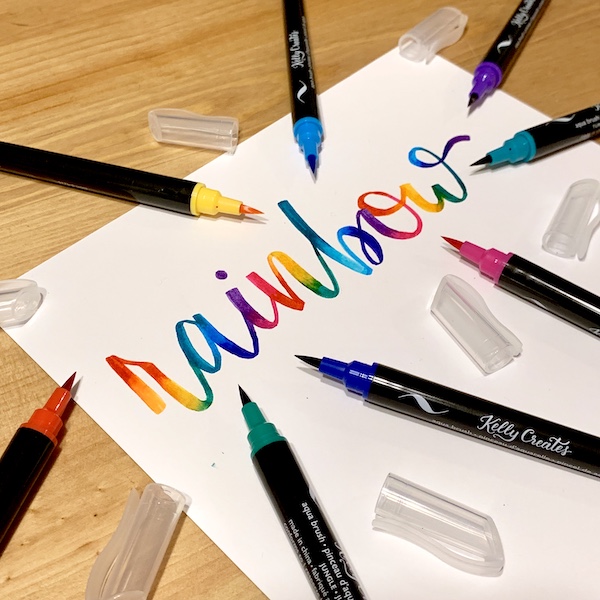
Happy Spring! I don’t know about you, but I am excited about Spring and *hopefully* some soon-to-be warmer weather! When I was lettering for St. Patrick’s Day, I was blending colors for some pretty rainbow effects because one of my favorite lettering techniques is blending. In this tutorial, I am going to teach you how to do rainbow lettering using the Kelly Creates Aqua Brushes since we can do rainbow lettering all year round.

SUPPLIES: Kelly Creates Aqua Brushes, Project Pad, Deluxe Lettering Kit, water cup, paper towel/rag
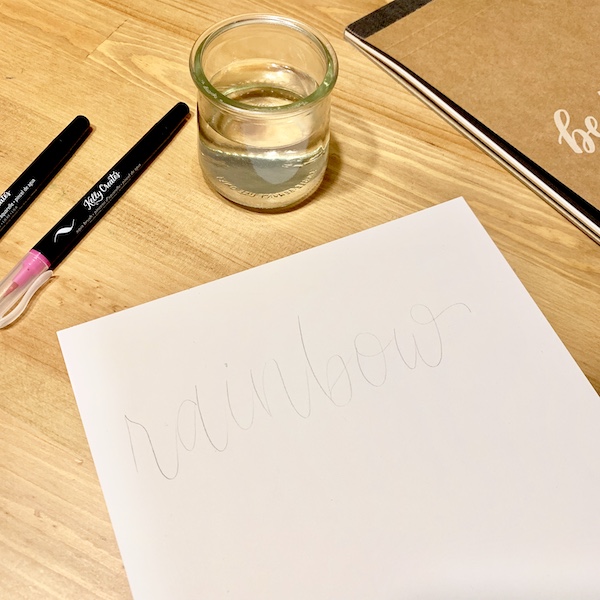
Along with the Aqua Brushes, you will need a small container of water, a paper towel, your pencil from the Deluxe Lettering Kit, and a thick piece of watercolor paper or smooth cardstock. Since I am using water and the Aqua Brushes which are water-based, I decided to use a piece of white card stock from my Kelly Creates Project Pad because the paper is silky smooth and perfect to use when blending the Aqua Brushes.

Now let’s get a little organized. First, I took the caps off of my Aqua Brushes and placed them in rainbow color order on a paper towel: Fire, Sunshine, Jungle, Turquoise, Sky, Ocean, Lilac, and Blossom. This way I can quickly pick up the next color to blend while the ink is still wet, which is very important in blending. Next, I lightly sketched out my word using the drawing pencil from the Deluxe Lettering Kit. Obviously, I chose the word ‘rainbow but you can choose any word or quote you like. If your pencil lines look too dark, lightly erase your word so that you can still see it, but it won’t show through the blend.
Time to start blending! Starting with the Fire red Aqua Brush, begin lettering at the top of your first letter using very thin, light strokes.
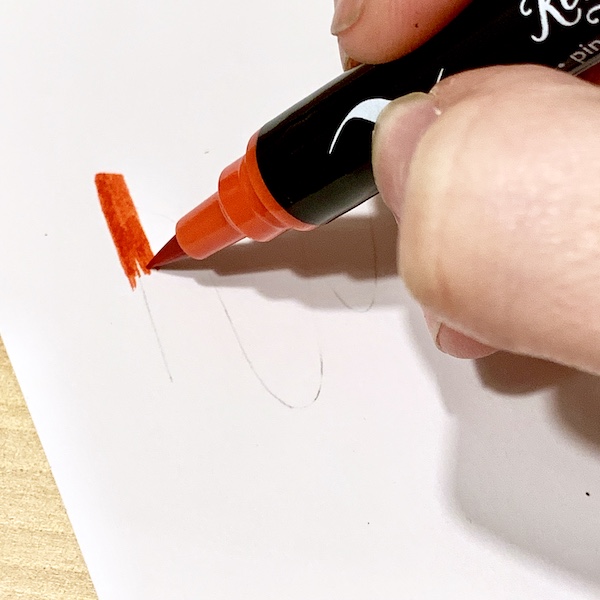
When doing a rainbow blend, you want to clearly see each color, as well as view those nice gradient blends in between each color. I try to make each color about a centimeter or two in length without making it too even. Once you finish with the Fire Aqua Brush, move on to the next color, Sunshine. Before you start blending the two colors together, dip the Sunshine Aqua Brush into your little container of water. This will help keep the brush extra wet and help you blend the two colors together.
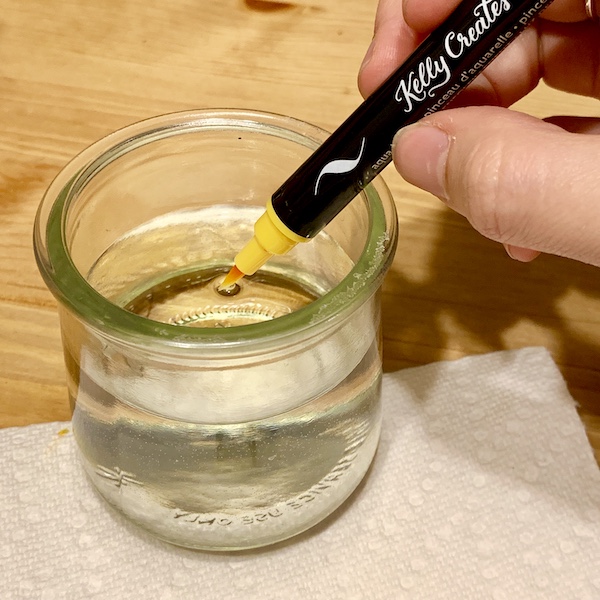
Once the tip is wet, begin your strokes slightly above where you stopped your previous strokes, blending downwards using those thin, light strokes again. By doing this, you are pulling some of that Fire color down into the Sunshine color to make a sort of sunset orange. Keep blending down using your thin, light strokes until the Sunshine color is that bright, beautiful yellow again.

Next, pick up your Jungle Aqua Brush and do the same thing, making sure to dip the tip into the water before beginning your strokes. You may not see as much of a blend between the yellow and the green at first. What I like to do is go back and pick up the Sunshine Aqua Brush again and start blending in the opposite direction from the Jungle color, pulling the green into the yellow. This is also why I keep a paper towel close by, so that I can wipe off the excess Jungle color that bleeds into the Sunshine Aqua Brush.
 Continue repeating these same steps and strokes with each color. Once you get to Blossom, begin again with the Fire color, blending each color into the next using those thin, light strokes.
Once you are done, admire your beautiful blending and touch up any blended areas that need it.

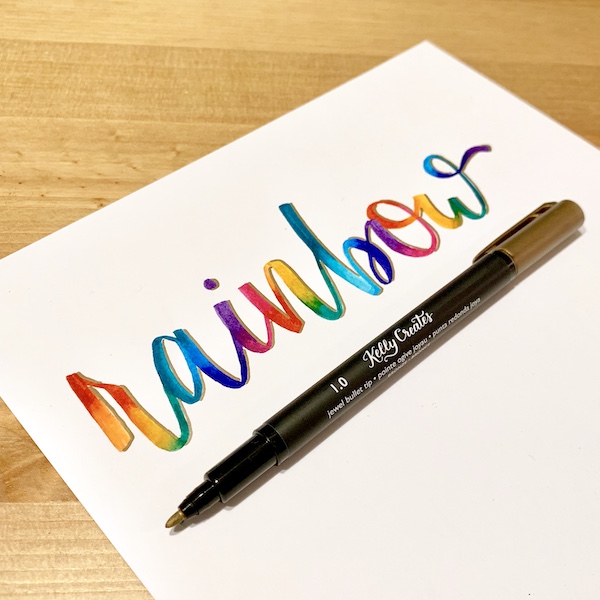
For extra ‘wow’, add a metallic drop shadow. I used my Kelly Creates Metallic Jewel Bullet Tip Pen in Bronze to add a slight shadow, making sure to stay to the right of all of my strokes. I hope you give rainbow lettering a try….I look forward to seeing everyone’s beautiful rainbow blends!
Thank you Stephanie for sharing this colourful blending technique with all of us. I see lots of rainbow lettering in my future! For more inspiration and lettering art, follow Stephanie on Instragram @simplystephlettering and her Facebook page Simply Steph Lettering.
SHOP the supplies Stephanie used by clicking on the affiliate shopping links below:


Joan
March 31, 2019 at 6:48 pm (7 years ago)Vraiment magnifique. Il y a tellement de possibilités avec les crayons Aqua. Un jour j’en aurai sous la main. Pour l’instant je ne suis qu’une débutante alors j’apprends les mais je regarde toutes les possibilités qui se présente afin de m’amétioler.
Rosann DuChette
April 1, 2019 at 10:27 am (7 years ago)Fun technique for me to try! Thank you!
Linda Epstein
April 3, 2019 at 4:36 pm (7 years ago)Nice technique for beautiful lettering. Thanks for sharing this.
chad madill
April 5, 2019 at 2:47 pm (7 years ago)kelly, are those markers your brand? because I can see kelly written on it. if so, do you sell it online somewhere?
Kelly
April 10, 2019 at 10:22 am (7 years ago)Yes the pen are my brand Kelly Creates and the shopping links are at the end of the blog post. Or you can shopping my online store by clicking this link http://www.kellycreates.ca
Chasity
April 10, 2019 at 4:44 pm (7 years ago)This is beautiful! I love how you used the gold as the shadow! Brilliant!
#IshyMonkeyRollerSkatingChamp27!!
November 28, 2019 at 8:19 am (7 years ago)Thank you so much for sharing this!! I have a business where I sell anything and everything “Artzy”, and your tutorials and ideas are a BIG hit & this “Colorful Rainbow Hand Lettering” was pretty close to perfect. My only question is, “When you are blending the colors using this method, would it ruin the actual marker color??
Kelly
November 28, 2019 at 1:38 pm (7 years ago)The original marker color is not ruined. You would just ‘scribble’ out the added color until it writes in it’s original ink. Sometimes the tip stains but that doesn’t change the ink color.